I love finding good products in the drugstore!! I feel like it is such a good bargain, because the price is low, but the quality is great! I have tried SO many drugstore products but here are the ones worth mentioning!
FACE
- Almay Clear Complexion Line. This includes the liquid foundation, the pressed powder, and the concealer, I love them all!! I have mild acne prone skin and the coverage is great (not cakey or powdery) and it doesn't break me out~
- Jane Be Pure Mineral Pressed Powder- I use this on my lazy days. I just get my kabuki brush and apply this to my whole face and it looks really really nice. and it has enough coverage for my redness and little acne scars.
- mark. Face xpert Flawless Touch Makeup- I don't know if this is considered a 'drugstore' brand but it is cheap!! (I remember around under $10??) It's a liquid foundation with a very cool dot applicator that I adore! The finish is soo great and it makes you look very natural.
- Revlon Custom Creations (liquid foundation)- I was a little skeptical about this because I thought it would break me out but it didn't!! I love how you can choose from 5 different shades in just one product so for sure you'll get your exact shade!~ After application, my skin looks radiant and does not give me a dull complexion at all.
LIPS
- Neutrogena MoistureShine Gloss - I have this in Groove (dupe of NARS Turkish Delight) and First Blush (my absolutely favorite) I just LOVE these glosses. They are not sticky at all and just feel sooo moiturizing on the lips! They look natural and not tacky!
- Revlon Super Lustrous Lipgloss- I have this in Cherries in The Glow ( perfect red that is not too bold and not too sheer) and Nude Lustre (the perfect pink nude color)
- CoverGirl Wetslicks Fruit Spritzers- After seeing Rihanna looking oh so fabulous advertising this gloss, I just had to have it!! (I'm such a sucka lol) I got this in 'raspberry splash' and love it!! It tastes great and the color is great and it's not goopy and sticky, it's just right!
CHEEKS
- CoverGirl Classic Color Blush- This was my very first blush in 'soft mink' and it is still one of my favorites today! It gives such a radiant glow and I bought my friend one, and she loved it also!!
-Rimmel London Blush - in 'Apricot' . love love love. i love blushes that make me GLOW and this is a definite keeper.
EYELINER
- Revlon Colorstay Eyeliner (pencil)
and
-Styli-Style Thick & Thin Flat Liner (pencil)
^these two eyeliner pencils are the only two I can find to stay put! It works better than my MakeUpForever Aqua Eyes Eyeliner.
more recommendations to come soon!
Friday, May 9, 2008
Tuesday, April 22, 2008
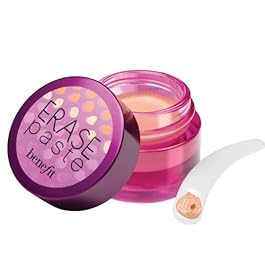
Benefit Erase Paste
O-M-G! So girls, I think I might have found my holy grail saving grace undereye concealer!! Wow today is a new day!! hahaha. Presenting....... Benefit Erase Paste!!
BEFORE:

AFTER:

COMPARISON:

 I have to say, at first, I was a whole lot skeptical about trying this out because I have had a bad history of not liking ANY Benefit products I have tried before. But you know me, always on my quest to find the magic undereyeconcealer haha. After reading some overall good reviews on makeupalley.com ( <-- LOVE this site), I decided to try it out even though I was put off again by the little shade selections Benefit gives us. I went to Sephora a few days ago and first tried shade 1 on the inside of my wrist. (I'm an NC30 for reference). It matched fairly closely but thought it would be a little too light for my face and would give me a reverse raccoon effect. I tried shade 2 on my inner wrist and it was definitely darker than 1 and definitely more peachy/pinky. I know that peachy tones work better for undereye darkness so I ended up buying shade 2. While I was in my car, I checked my wrist in natural sunlight and shade 2 looked too dark!! uh ohhhhh now I was worried (I hate exchanging/returning stuff lol). I rushed home and immediately tried it! On one eye I used the technique they provided for us ( scoop a little product with the spatula, rub it on the back of your hand to warm and apply with ring finger) ehhhhhhh that was alright but on my other eye, I just tried it with a concealer brush and it is MUCH better!! AND the shade matched surprisingly very well!!! shocker! lol It instantly brightens, sooo blendable, and the coverage is pretty good also!! I set it with Lauren Mercier Secret Brightening Powder in #2 and I'm all set to go!!! =) The only strife here is that it's $26 for a small jar. eek!! but it's worth it !! =D
BEFORE:
AFTER:
COMPARISON:
 I have to say, at first, I was a whole lot skeptical about trying this out because I have had a bad history of not liking ANY Benefit products I have tried before. But you know me, always on my quest to find the magic undereyeconcealer haha. After reading some overall good reviews on makeupalley.com ( <-- LOVE this site), I decided to try it out even though I was put off again by the little shade selections Benefit gives us. I went to Sephora a few days ago and first tried shade 1 on the inside of my wrist. (I'm an NC30 for reference). It matched fairly closely but thought it would be a little too light for my face and would give me a reverse raccoon effect. I tried shade 2 on my inner wrist and it was definitely darker than 1 and definitely more peachy/pinky. I know that peachy tones work better for undereye darkness so I ended up buying shade 2. While I was in my car, I checked my wrist in natural sunlight and shade 2 looked too dark!! uh ohhhhh now I was worried (I hate exchanging/returning stuff lol). I rushed home and immediately tried it! On one eye I used the technique they provided for us ( scoop a little product with the spatula, rub it on the back of your hand to warm and apply with ring finger) ehhhhhhh that was alright but on my other eye, I just tried it with a concealer brush and it is MUCH better!! AND the shade matched surprisingly very well!!! shocker! lol It instantly brightens, sooo blendable, and the coverage is pretty good also!! I set it with Lauren Mercier Secret Brightening Powder in #2 and I'm all set to go!!! =) The only strife here is that it's $26 for a small jar. eek!! but it's worth it !! =D
Thursday, April 17, 2008
'Showy' Eye Tutorial
So I got a couple requests to do a tutorial on the look I did two posts down. My end result today didn't show up EXACTLY like the previous EOTD, but it's close enough and it's the same colors and same concept lol so please forgive me =)

Products Used:
- Urban Decay Primer Potion
- MAC Cream Colour Base in Pearl
- L'oreal Hip bright shadow duo in 'Showy' (left side of the duo)
- MAC Smut e/s
- MAC Smoking e/s in the Smoking Eyes Quad
- MAC Shroom e/s
- MAC Blitz & Glitz Fluidline
- CoverGirl LashBlast
- MAC brushes in 217, 209, 219
- Bobbi Brown essential eye smudge brush
- Sephora Blending Eye brush
-Sonia Kashuk Basic Eyeshadow Brush

Start off with a clean eye. Then prep your eyelids with a base. First put UDPP all over the eye area and after, put the MAC CCB in Pearl on top of that.

Put loose powder under your eyes to catch any fallout. Looks dumb! But it works ! lol. I used NYC Smooth Skin Loose Powder in Translucent.

I take my Sonia Kashuk eyeshadow brush and take the left side color of the ‘showy’ duo and put it all over my lid extending a little past my crease.

Take Smut e/s with the MAC 217 brush (my new favorite blending brush, perfect for the crease!) and apply Smut on the crease while blending in the two shadows with back and forth motions, I guess you can say little ‘windshield wiper’ motions lol. I know in the previous step the color shows up to be a BRIGHT blue!! The color is a little off thanks to my camera (damn you camera!) When you blend in the Smut, the color turns into a more teal-y turquoise-y color like in this pic.

Next take your smudger brush and pull the eyeshadow on the crease up and out to blend.

Blended.

Take your Sephora Blending Brush and get some Smoking e/s and put it on the outer 1/3 of your eye.


Take your Shroom e/s with the 217 and put it on your brow bone, blending it into the rest of the crease shadow.

Take your MAC 219 ‘Pencil’ Brush and get Smoking e/s and put it on the outer half of your lower lashline and get your Showy e/s and put it on the inner half of your lower lashline and blend the two together.

Add your eyeliner of choice on your top lashline and bottom lashline.

Put Mascara on, and you’re done!!! =D
Products Used:
- Urban Decay Primer Potion
- MAC Cream Colour Base in Pearl
- L'oreal Hip bright shadow duo in 'Showy' (left side of the duo)
- MAC Smut e/s
- MAC Smoking e/s in the Smoking Eyes Quad
- MAC Shroom e/s
- MAC Blitz & Glitz Fluidline
- CoverGirl LashBlast
- MAC brushes in 217, 209, 219
- Bobbi Brown essential eye smudge brush
- Sephora Blending Eye brush
-Sonia Kashuk Basic Eyeshadow Brush
Start off with a clean eye. Then prep your eyelids with a base. First put UDPP all over the eye area and after, put the MAC CCB in Pearl on top of that.
Put loose powder under your eyes to catch any fallout. Looks dumb! But it works ! lol. I used NYC Smooth Skin Loose Powder in Translucent.
I take my Sonia Kashuk eyeshadow brush and take the left side color of the ‘showy’ duo and put it all over my lid extending a little past my crease.
Take Smut e/s with the MAC 217 brush (my new favorite blending brush, perfect for the crease!) and apply Smut on the crease while blending in the two shadows with back and forth motions, I guess you can say little ‘windshield wiper’ motions lol. I know in the previous step the color shows up to be a BRIGHT blue!! The color is a little off thanks to my camera (damn you camera!) When you blend in the Smut, the color turns into a more teal-y turquoise-y color like in this pic.
Next take your smudger brush and pull the eyeshadow on the crease up and out to blend.
Blended.
Take your Sephora Blending Brush and get some Smoking e/s and put it on the outer 1/3 of your eye.
Take your Shroom e/s with the 217 and put it on your brow bone, blending it into the rest of the crease shadow.
Take your MAC 219 ‘Pencil’ Brush and get Smoking e/s and put it on the outer half of your lower lashline and get your Showy e/s and put it on the inner half of your lower lashline and blend the two together.
Add your eyeliner of choice on your top lashline and bottom lashline.
Put Mascara on, and you’re done!!! =D
Thursday, April 10, 2008
Eyebrow Tutorial
Today I'm going to show you girls how to do your brows my way! lol I did one brow with eyeshadow and one with an eyebrow pencil~ Let's get started! =D

Products Used
-Sephora Dual Eyelash/Brow Comb
-Tweezerman Tweezers
-Some random eyebrow scissors (not pictured in the tut)
-MAC Spiked eyebrow pencil
-MAC 212SE brush
-MAC Espresso e/s
[EYESHADOW EYEBROW]

First, start off with a clean brow. I take my eyebrow brush side and brush my brows horizontally across.

Then vertically up.

Take the eyelash part of the comb and brush your hairs up on the inner half of the brow and you see all that hair sticking out?! Trim it off with eyebrow scissors! Do the same with the outer half of your brow. Brush your hairs down (indicated by the red arrows) and trim whatever is sticking out.

Tweeze any stray hairs. Make sure you don’t overpluck, just follow your natural brow shape and just pluck what doesn’t belong. The red line indicates where you should be plucking.

I take my MAC Espresso e/s and I get a flat stiff brush (MAC 212SE). Pick up some shadow with your brush (not a lot) and draw a line under your brow desirable to the shape you want.

Do the same for the top of your brow. See those hairs sticking out on the bottom?? (the red arrows give them away lol!) You can either trim them now or trim them when you’re done with the brow.

Time to blend the shadow into your brow! Don’t pick up anymore shadow and take your stiff flat brush, line it horizontally to the harsh line on the bottom.

Then pull up the shadow to blend it in with the rest of the brow. For the top line, pull down the shadow to blend it in with the brow. And you can always add more shadow (don’t over do it) if needed to define your arch or extend your brows a little longer at the end but make sure it looks natural~
Finished eyebrow!!!
Before:

After:


[PENCIL EYEBROW]
Brush, trim, and pluck the other brow like you did the previous one. Now look really hard at your eyebrows and see what direction your hair grows in. For my wacky brows, it has like four different directions lol. This is essential in the brow process because basically we want to draw little ‘hairs’ to fill in our brows with the pencil.

So I’m starting off in the inner part of my brow. The pink line indicates the direction of my hair (this will be different for everyone). Fill in the part with light strokes ( like hair ), you don’t want any harsh lines.

Now my hair is growing a different direction so I’m going to go with the flow~~ lol.

On the top of my arch, my hair grows down, so I’m going to fill in the sparse spaces downwards.

Now, finally the end of my eyebrow
And you’re done!!
Before:

After:

simple enough right?? lol if anyone has any specific questions about the process, feel free to ask!!! I'm here to help!!! =D
Products Used
-Sephora Dual Eyelash/Brow Comb
-Tweezerman Tweezers
-Some random eyebrow scissors (not pictured in the tut)
-MAC Spiked eyebrow pencil
-MAC 212SE brush
-MAC Espresso e/s
[EYESHADOW EYEBROW]
First, start off with a clean brow. I take my eyebrow brush side and brush my brows horizontally across.
Then vertically up.
Take the eyelash part of the comb and brush your hairs up on the inner half of the brow and you see all that hair sticking out?! Trim it off with eyebrow scissors! Do the same with the outer half of your brow. Brush your hairs down (indicated by the red arrows) and trim whatever is sticking out.
Tweeze any stray hairs. Make sure you don’t overpluck, just follow your natural brow shape and just pluck what doesn’t belong. The red line indicates where you should be plucking.
I take my MAC Espresso e/s and I get a flat stiff brush (MAC 212SE). Pick up some shadow with your brush (not a lot) and draw a line under your brow desirable to the shape you want.
Do the same for the top of your brow. See those hairs sticking out on the bottom?? (the red arrows give them away lol!) You can either trim them now or trim them when you’re done with the brow.
Time to blend the shadow into your brow! Don’t pick up anymore shadow and take your stiff flat brush, line it horizontally to the harsh line on the bottom.
Then pull up the shadow to blend it in with the rest of the brow. For the top line, pull down the shadow to blend it in with the brow. And you can always add more shadow (don’t over do it) if needed to define your arch or extend your brows a little longer at the end but make sure it looks natural~
Finished eyebrow!!!
Before:
After:

[PENCIL EYEBROW]
Brush, trim, and pluck the other brow like you did the previous one. Now look really hard at your eyebrows and see what direction your hair grows in. For my wacky brows, it has like four different directions lol. This is essential in the brow process because basically we want to draw little ‘hairs’ to fill in our brows with the pencil.
So I’m starting off in the inner part of my brow. The pink line indicates the direction of my hair (this will be different for everyone). Fill in the part with light strokes ( like hair ), you don’t want any harsh lines.
Now my hair is growing a different direction so I’m going to go with the flow~~ lol.
On the top of my arch, my hair grows down, so I’m going to fill in the sparse spaces downwards.
Now, finally the end of my eyebrow
And you’re done!!
Before:
After:
simple enough right?? lol if anyone has any specific questions about the process, feel free to ask!!! I'm here to help!!! =D
Sunday, April 6, 2008
My EOTD!
I like the eyemakeup I did today so decided to post up an EOTD !(eyes of the day)

What I Used
- MAC CCB in Pearl
-L'oral Hip Bright Shadow Duo in 'Showy' (only the left color)
- MAC Smut e/s
- MAC Smoking e/s from the Smoke Signals Quad
- MAC Shroom e/s
- Mac Engraved Powerpoint Pencil
My usually made up eyebrows are left bare today hahaha and that reminds me... brow tutorial coming shortly!! =)
Friday, April 4, 2008
Smokey Eye Tutorial!

Products Used:
- Urban Decay Primer Potion
- MAC Cream Colour Base in Pearl
- Neutrogena nourishing eye duo in 'Starry Night'
- NYX e/s in Charcoal
- MAC e/s in Smoking
- MAC e/s in Naked Lunch
- MAC fluidline in Blitz & Glitz
- NYX Ultra Pearl Mania
- NYC Smooth Skin Loose Face Powder in Translucent
- Sonia Kashuk eyeshadow brush
- MAC brush 272, 219,209
- Sephora Professional Blending Eye Brush

This is the look we're going to achieve! My foundation, concealer, and brows were done before starting this tutorial.

Prep your eyelids with a base. I'm using UDPP and MAC Cream Colour Base in Pearl. Apply all over lid and past the crease.

Put loose powder under your eye to catch any fall out. Looking ridiculous is very crucial in this step hahaha!

Apply a light silver shadow on the inner 1/3 of your lid and past your crease with a regular eyeshadow brush. You can go as high above as you want.

Now apply a darker gray shadow to the middle of your lid with the same eyeshadow brush. Make sure you wiped off the shadow from before. When applying shadow, try to pat your shadows on the lid instead of sweeping it. Patting your shadows leads to less fall out and more color payoff. Don’t worry about blending the colors yet, we’ll do that later =)

Take your 272 brush or any angle e/s brush you might have, get some black e/s, and draw an angled line extending from the outer corner of your lid.

Using the same angle brush, connect the end of that line to the rest of your shadow.

Fill in the empty space with black e/s. Now it’s time for blending! Oh how I LOVE my Sephora blending brush!! It’s popping out in the picture because it’s so eager to blend lol! You see those harsh edges and separation of colors?? Big no no!!

Tada! Blending done! I use little tiny circular motions in between the colors. I don’t really favor the windshield wiper motion.

Add a highlight to the brow bone and blend it into the rest of your shadow. I’m using MAC Naked Lunch e/s.

Wipe off the loose powder under your eyes with a sponge then Add your liner of choice to the top of your lid and also your bottom. I love my fluidliners! Can’t live without them! As you can see, I’m a HUGEEEE fan of winged liner, I do it almost everyday!~

Now take your pencil brush the MAC 219 and first take your black e/s and put it on the outer 1/3 of your lower lid, right under the liner. Take the same gray you used on the top lid and put it on the middle of your lower lid. Finally, take the same light silver you used and put it in the inner 1/3 of your lower lid. Smudge and blend them all together with the same pencil brush.

Add a nice shimmery white highlight to the very inner corners of your eye. I’m using NYX Ultra Pearl Mania loose pigment. It’s a subtle change but really makes a big difference!

Apply mascara of choice. Maybe 2-3 coats. And make sure you comb through with an eyelash comb! Don’t want no clumps now do we?!?!
Smokey Eyes DONE! Yaaay!
Now put on a nice subtle shimmery peach or pink blush and a light lipgloss and take out your camera because it’s time to be a CAMWHORE!!!!! =D

PEACE OUT PRETTY LADIES~~! *MUAH*
Subscribe to:
Posts (Atom)